Showing posts with label diy craft. Show all posts

Monday, 27 May 2013

DIY Tutorial - How to make flower bunting. Perfect for little tea parties!

The perfect setting for a little tea party - a nook in the garden with floral bunting draped from a tree. Divine!


This bunting is REALLY easy to make - perfect for beginners or anyone needing a super quick project to add magic to an event.

What we used:
4.5 metres of our cotton embroidered lace HERE
fabric flowers (peonies on mesh) x 11 lots Purchase 4 lots of peony pink, 3 lots of light pink & 4 lots of pink.
Pins
Sewing Machine or needle and thread.

HOW TO:
  • I cut our flower strands into groups as follows: 'peony pink'  - 6 strands of 5 flowers, 'pink' - 6 strands of 6 flowers, and 'light pink - 4 strands of 4 flowers
  • Pin the strands onto the lace. I pinned the peony pink flowers first, pinning approx every 1/2mtr.  I left around 85cm at each end blank (ie don't pin the flowers there) to make sure there was plenty of lace to tie around the tree branch.

  • After pinning the peony pink flowers in place, I then moved onto the 'pink'. I pinned these roughly 17cm up from the other flowers.  You can get more mathematical than me & making them exactly even but I didn't see the need!
  • Lastly, pin the light pink flower strands inbetween the 'pink' and the next 'peony pink'.
  • Sew one continuous line along the cotton lace, making sure you catch all the flower strands. Hold the petals out of the way as you go ... and be sure not to run over your pins!

  • And that's it!!!

Thursday, 16 August 2012

DIY Tutorial - 4 hair clips in 4 mins!

Yes, you CAN make gorgeous hair clips with not much fuss & no sewing skills whatsoever!


What you need:

 Clip 1:


 Clip 2:
 
 Clip 3:

 
 Clip 4:
  • Take one ribbon-covered clip & the small gold flower.
  • Squeeze a fair amount of glue onto the back of the flower then press it in place onto the clip.
  • Hold for 3 seconds - then you're done!
  • Cost: $1.10 (plus glue)


 And there you have 4 pretty new hair clips to match so many different outfits ... and all for under $8.00!

Happy Creating

x


Monday, 9 January 2012

DIY -How to make Shabby-chic lace headbands

I'm having a bit of fun playing with my new laces & trims which are to be sold in the Little Tee Tee store.  I'm hoping my creations will help with a little inspiration on how to put stretch laces & fabric flowers to good use!


Team this white beaded stretch lace (available here) & these pretty flowers (available here) to make the above gorgeous headband.  I simply overlapped 3 of the white flowers & sewed them directly onto the lace headband. Easy!


I love this headband!  So simple, so shabby chic. Use a wide stretch elastic (this one available here), & sew in two pleats to make one section skinnier.  Add a singular rose (variety available here) as the focal point by carefully sewing around the base of the rose & then trimming off excess mesh.


Handy Headband Tutorial tips:

  • Measure the head of the person wearing the headband, where the headband is going to sit.

  • Cut the lace to the above measurement.

  • Sew at raw edge with right sides together. I use a zig-zag stitch & go back and forth at least 3 times. 


  • Want to see new laces & trims as soon as they arrive? Join my Little Tee Tee Laces & Trims facebook page now!


    Happy Creating!

    Saturday, 10 December 2011

    Christmas cooking with kids - Cupcake / cookie decorations


    This is another fun 'craft' to do with your kids (or without, if you so choose!).  And the great thing is that it doesn't require cooking & is relatively mess-free.

    ingredients
    Box of white icing (aka fondant). (like this one  HERE -but doesn't matter what brand!)
    Food colouring. I use Wilton gel colours.
    Decorations - I used coloured cashous & also picked out stars from a sprinkle mixture)
    Icing sugar.
    Baking/wax paper
    Rolling pin (silicon is best)
    Cookie cutters

    how to:
    • Cut about a 1/4 of the icing off the block to use. Wrap the remainder & store in a container in the cupboard.

    • Knead the icing so it softens like play dough then add your colour a little bit at a time until you achieve the desired colour.


    • Sprinkle a little icing sugar on your sheet of baking paper & also rub some onto your rolling pin.

    • Roll the icing until it's no more than 1/4" thick. Be sure to recoat your rolling pin with icing sugar if the mixture starts to stick.

    • Cut your shape using the cookie cutter & decorate as desired. We pressed the cashous directly into the softened fondant but you could also 'glue' them on using a little bit of water/sugar paste.

    • Leave to dry for as long as it takes, depending on the temperature of the room. Ours took 24hrs.


    At this point you can either store them for months in advance in an airtight container in the cupboard or use them to decorate some yummy treats!  We used store-bought tic-toc biscuits & glued the Christmas tree on top by using a dab of icing sugar/water mixture.

    The most important ingredient = fun.

    xx


    ps - if you'd like more tips on working with white icing/fondant this is a great page.

    Wednesday, 7 December 2011

    Christmas cooking with kids - Oreo truffle balls


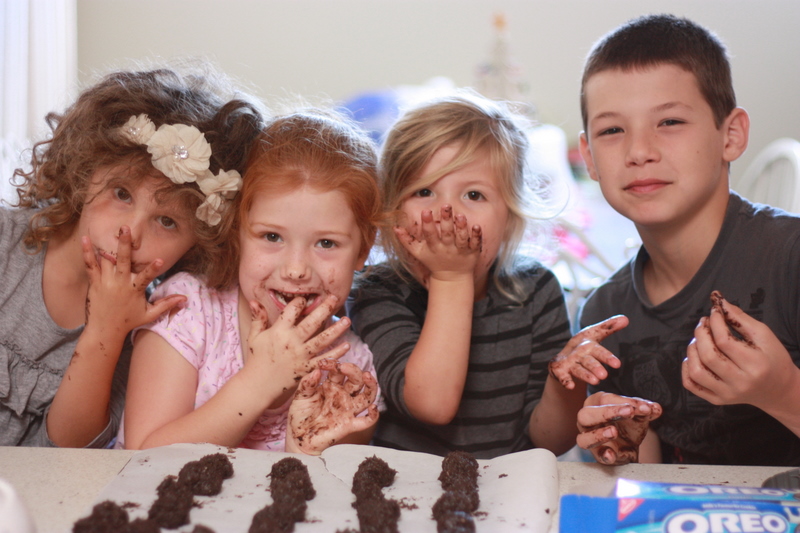
    Christmas is not Christmas until the benches have been covered in some variation of sugar, little fingers have been covered in yummy goo, and faces have been smeared with chocolate.  Such is the fun of 'cooking' with kids!

     I say 'cooking' because our first Christmas treat this year was a no-cook Orea truffle ball creation.  Yum, yum, yum!
    Ingredients -
    1 pkg. (8 oz.) Cream Cheese, softened
    2 pkg.  OREO Cookies, finely crushed (not powdered!) 
    Enough Semi-Sweet Chocolate, melted, to cover the balls.


    MIX cream cheese and cookie crumbs until well blended.
    SHAPE into 1-inch balls & refridgerate for an hour.
    DIP in melted chocolate; place on waxed paper-covered baking sheet.
    For extra effect you could sprinkle with extra cookie crumbs, drizzle another coloured chocolate on top, roll in 100's & 1000's.
    Store in tightly covered container in refrigerator.

    I took a few tips from the Kraft website.  Perhaps I should have read these before making our own batch! ...

    Kraft Kitchens Tips

    How to Melt Chocolate
    Place unwrapped chocolate squares in microwaveable bowl. Microwave on HIGH 2-1/2 min. or until chocolate is completely melted, stirring every 30 sec.
    How to Easily Dip Truffles
    To easily coat truffles with the melted chocolate, add truffles, in batches, to bowl of melted chocolate. Use 2 forks to roll truffles in chocolate until evenly coated. Remove truffles with forks, letting excess chocolate drip back into bowl. Place truffles on prepared baking sheet; let stand until firm.


    Sunday, 4 December 2011

    venice (guipere) lace

    if you haven't guessed by browsing through some of my creations ... I LOVE LOVE LOVE lace. Especially the luxurious Venice lace - or otherwise known as guipere lace.


    The thought of working with lace is some times daunting for beginners but, believe you me, it shouldn't be!  Lace can hide a multitude of sins & can make a somewhat plain creation look like a masterpiece.


    A simple, store bought singlet can be transformed in such a short time with even just one row of lace - Venice or otherwise - & a couple of well-placed fabric roses.


    And once you've found your feet with that kind of project you're ready to tackle something even more spectacular ... like one of Little Tee Tee's ruffled flower girl dresses!


    Ready to start creating? Perhaps you'd like to do a spot of lace shopping in our new range of laces & trims!?!  Yes, I've branched out into supplying GORGEOUS laces in all sorts of styles & colours and sourced from all over the world.  I'll be adding new supplies fairly regularly so be sure to keep visiting.

    Little Tee Tee laces supplies HERE.

    If you have something you are searching for and you can't find it, please feel free to let me know & I'll see if I can source it for you.

    Happy sewing!!!


    Wednesday, 14 September 2011

    DIY - rainbow craft

    i may be getting a little carried away with the rainbow theme but after discovering the artwork in my previous post I was pointed to a whole bunch of other bright & cheerful crafts.  Can't resist sharing more with you!

    This sensory garden  was posted by 'share and remember' (HERE) & is made of coloured rice.  Nice & easy - all you need is food colouring, rice, rubbing alcohol, zip-lock bags & drying containers ... + a bit of sunshine!  I can see my little girl delighting in playing with this rainbow trough & using all her sand toys in there.  Be sure to supervise your youngesters if they have a tendency to put things in their mouths!


    The next little project to catch my eye was this pencil necklace by www.minieco.co.uk. Jewellery with a twist!

    Actually minieco have a few great rainbow crafts ... I love this easy paper bead idea too.  This is definitely on my 'to-do' list now!

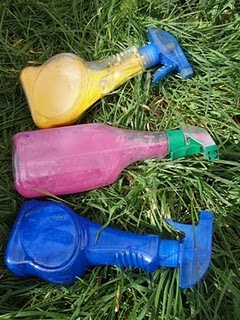
    And the last rainbow craft idea I'd like to share (& try myself)  is this cute toddler spray paint idea by 'Sun Hat & Wellie'.  Recycle those used spray bottles, add a bit of paint & water, and you have yourself a little graffiti artist in the making!.  See HERE for more details.


    If you have a cool craft you'd like to share ... please let me know!

    Monday, 12 September 2011

    DIY - rainbow artwork

    i love the colours of a rainbow so fell in love with this cool DIY art project.

    What an eye-catching piece for any room. Relatively cheap & extremely easy!

    This photo was taken from a very cool blogger - click on this link to see how you can make this artwork HERE.

    Happy hairdrying!